Reference
The following discussion is a summary of the American Association of Critical-Care Nurses’ Essentials of Critical Care Nursing (Burns), Chapter V: Airway and Ventilatory Management (Robert E. St. John and Maureen A. Seckel)
Diagnostic Tests, Monitoring Systems, and Respiratory Assessment Techniques
KNOWLEDGE COMPETENCIES for this chapter include:
- Interpretation of normal and abnormal arterial blood gas results, and common management strategies for treatment.
- Identify indications, complications, and management strategies for artificial airways, oxygen delivery, and monitoring devices.
- Identify indications, principles of operation, complications, and management strategies for mechanical ventilation
- Describe the concepts of respiratory muscle fatigue, rest, and conditioning as they relate to the mechanically ventilated weaning patient.
- Identify essential components for the successful design and use of weaning predictors, protocols for weaning trials, and multidisciplinary institutional approaches to the care of long-term mechanically ventilated patients.
Arterial Blood Gas Monitoring
ABG monitoring is frequently performed on critically ill patients to assess acid-base balance, ventilation, and oxygenation. The blood gas analyzer determines oxygen tension (PaO2), carbon dioxide tension (PaCO2), and pH, from which several other parameters are calculated, including base excess (BE), bicarbonate (HCO-3), and oxygen saturation (SaO2).
Arterial blood gas samples are obtained by a direct puncture of an artery, usually the radial artery, or by withdrawing blood from an indwelling arterial catheter system. A heparinized syringe is used to draw the sample to prevent clotting prior to analysis. The samples are kept on ice unless the sample will be immediately analyzed in order to prevent further shifting of CO2 and O2 in and out of the red blood cells. Equipment for drawing is usually kept in or near the critical care unit to maximize accuracy and decrease the time for reporting of results.
Regardless of the method used to obtain the ABG sample,
Practitioners obtaining ABG samples should wear gloves and follow universal precautions to prevent exposure to blood during the sampling procedure!
| Parameter | Normal Value |
|---|---|
| Arterial Blood Gases | |
| pH | 7.35 to 7.45 |
| PaCO2 | 35 to 45 mm Hg |
| HCO-3 | 22 to 26 mEq/L |
| Base | -2 to +2 mEq/L |
| PaO2 | 80 to 100 mm Hg (may vary with age and altitude) |
| SaO2 | >95% (may vary with age and altitude) |
| Mixed Venous Blood Gases | |
| pH | 7.32 to 7.42 |
| PmvCO2 | 40 to 50 mm Hg |
| McvO2 | 35 to 45 mmHg |
| SmvO2 | 60% to 80% |
| Respiratory Parameters | |
| Tidal Volume (VT) | 6 to 8 mL/kg |
| Respiratory Rate | 8 to 16 respirations/min |
| Respiratory static compliance | 70 to 100 mL/cm H2O |
| Inspiratory Force (IF) | -20 cm H2O |
| Respiratory Calculations | |
| Alveolar gas equation (PAO2) | |
| Static Compliance |
In-dwelling Arterial Catheters
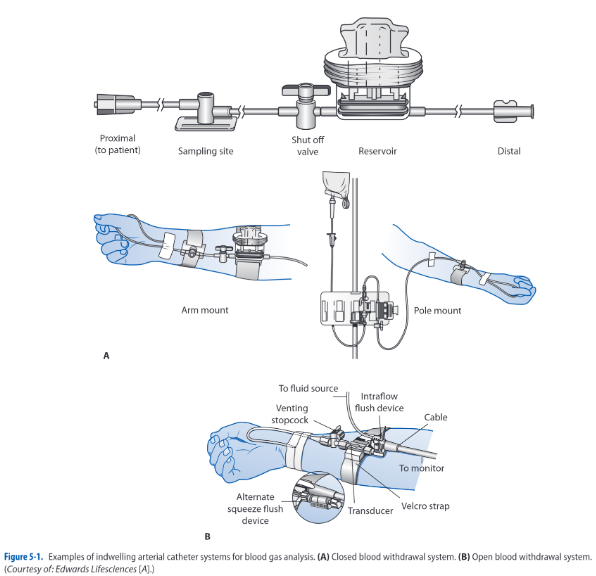
These systems provide sites where arterial blood can be withdrawn for analysis. Indwelling syringes, a reservoir, or using a stopcock, a 3- to 5-mL sample is withdrawn to clear the catheter system of any flush system fluid. Afterwards, a 1-mL sample for the ABG analysis is obtained in a heparinized syringe. Any remaining air is removed from the syringe and is capped with an air-tight end. It is placed on ice to ensure accuracy of the measurement. The catheter system is then flushed to clear the line of any residual blood.
Complications with this technique include infection and hemorrhage. Any time an invasive system is used, the potential exists for contamination of the system. Needleless systems reduce risk for infection and risk for needlestick injuries on behalf of the critical care practitioner. Hemorrhaging is a rare complication, occurring when stopcocks are inadvertently left in the wrong position after blood withdrawal. This can be avoided with proper technique during sampling, limiting sample withdrawal to experienced practitioners, and keeping the pressure alarm system of the bedside monitoring system activated at all times.
Arterial Puncture
When indwelling arterial catheters are not in place, ABG samples are obtained directly by puncturing the artery with a needle and syringe. The most common sites for arterial puncture are the radial, brachial, and femoral arteries. The technique is simple, but requires experience, similar to a venipuncture.
An Allen Test is performed prior to obtaining a sample from the radial artery.
- Occlude both ulnar and radial pulses for a brief period of time. The forearm should be held upward during this period to facilitate blood emptying from the hand.
- Once the hand is blanched, the forearm is placed in a downward position, and the ulnar artery is released. Observe the hand for flushing to determine if the ulnar artery is alone is capable of supplying blood to the fingers if the radial artery is damaged.
Following the location of the pulsating artery and antiseptic preparation of the skin, the needle is inserted into the artery at a 45° angle with the bevel facing upward. The needle is slowly advanced until arterial blood appears, or if the insertion depth has went past the artery location.
- If blood is not obtained, withdraw the syringe to just below the skin, relocate and verify the pulsating artery, then advance the needle again.
Once the 1-mL sample has been obtained, the syringe is withdrawn and firm pressure is quickly applied to the insertion site with a sterile gauze pad. Handheld pressure is maintained for at least 5 minutes and the site is inspected for bleeding or oozing. If present, pressure should be reapplied until all evidence of oozing has stopped. Pressure dressings are not applied until hemostasis has been achieved.
- As described, all air should be removed from the ABG syringe and an airtight cap should be applied to the end (remove the needle first).
- It may be better to have another practitioner to aid in preparing the sample, while the other ensures the application of pressure to the site used.
Complications associated with arterial puncture include arterial vessel tears, air embolism, hemorrhage, arterial obstruction, loss of extremity, and infection. Proper technique reduces the occurrence of all of these complications.
- Damage to the artery may be decreased by using a smaller diameter needle (21 to 23 gauge in adults) and by avoiding multiple attempts at the same site. After one or two failed attempts at entering the artery, a different site should be selected or another experienced practitioner enlisted to attempt the ABG sampling. Institutional guidelines should be followed.
- Hemorrhaging can occur easily into the surrounding tissues if adequate hemostasis is not achieved with direct pressure. Bleeding into the tissue can range from blood loss with minimal local damage to large blood loss with loss of distal circulation and even exsanguination. Large blood loss is more commonly associated with femoral punctures and is often the result of inadequate pressure on the artery following needle removal. Bleeding from the femoral artery is difficult to visualize, so significant blood loss can occur before practitioners are alerted to the problem. As such, the femoral artery is the least preferred site for ABG sampling, and is only used when other sites are unavailable.
If repeated ABG analysis is required, the insertion of an arterial catheter and monitoring system may be required to decrease the risks associated with repetitive arterial punctures.
Analysis
The best approach to ABG analysis is a systematic one. Analysis is accomplished by evaluating acid-base and oxygenation status. Upon receipt of ABG results, the practitioner first identifies any abnormal values, then a systematic evaluation is done.
Optimal cellular functioning occurs when the pH of the blood is between 7.35 and 7.45. Decreases in pH below 7.35 are termed acidemia, and increases in pH above 7.45 are termed alkalemia. When the amount of acids or bases in the body increases or decreases, the pH changes if the ratio of acids to bases is altered; for example, if acid production increases and there is no change in the amount of base production, pH decreases. If the base production were to increase as well, as a response to increased acid production, then no change in pH would occur. There are strong systems in place to maintain the balance between acids and bases, even if one of these systems were to become abnormal. There are a variety, but the bicarbonate and carbon dioxide levels are the primary regulatory systems involved.
- Metabolic Component: Bicarbonate (HCO-3) level are controlled primarily by the kidneys and have been termed as the metabolic component of the acid-base system. By increasing or decreasing the amount of bicarbonate excreted in the kidneys, the pH of the blood can be increased or decreased. Changes in excretion may take up to 24 hours or longer to accomplish, but can be maintained for prolonged periods.
- Respiratory Component: Carbon dioxide (CO2) levels are controlled primarily by the lungs and are termed the respiratory component of the acid-base system. By increasing or decreasing the amount of CO2 excreted by the lungs, the pH of the blood can be increased or decreased. This change can occur rapidly by increasing or decreasing respirations (minute ventilation). Compensation by the respiratory system is difficult to maintain over long periods of time (>24 hours)
Acid-Base Abnormalities
A variety of conditions may result in acid-base abnormalities:
| Acid-Base Abnormality | Primary ABG Abnormalities | Compensated ABG Changes | |||
|---|---|---|---|---|---|
| pH | PaCO2 | HCO-3 | Respiratory (PaCO2) | Metabolic (HCO-3) | |
| Alkalemia | |||||
| Metabolic | ⬆️ | - | ⬆️ | ⬆️ | - |
| Respiratory | ⬆️ | ⬇️ | - | - | ⬇️ |
| Acidemia | |||||
| Metabolic | ⬇️ | - | ⬇️ | ⬇️ | - |
| Respiratory | ⬇️ | ⬆️ | - | - | ⬆️ |
- Metabolic Alkalemia: there is either a primary increase in hydrogen ion (H+) loss or HCO-3 gain. The respiratory system attempts to compensate for the increased pH by decreasing the amount of CO2 eliminated from the body (alveolar hypoventilation). This compensatory attempt by the respiratory system results in a change in pH, but rarely to a normal value.
- pH is above 7.45 and HCO-3 is more than 26 mEq/L.
- Clinical situations or conditions that cause metabolic alkalemia include: (a) loss of body acids, e.g. in nasogastric suctioning of HCl, vomiting, excessive diuretic therapy, steroids, hypokalemia) and (b) ingestion of exogenous bicarbonate or citrate substances.
- Management is directed at treating the underlying cause, decreasing or stopping the acid loss (e.g., antiemesis for vomiting), and replacing electrolytes.
- Metabolic Acidemia: there is excessive loss of HCO-3 from the body by the kidneys or there is an accumulation of acid. The respiratory system attempts to compensate for the decreased pH by increasing the amount of CO2 eliminated (alveolar hyperventilation). This compensatory attempt by the respiratory system results in a change in pH toward normal.
- pH is less than 7.35 and HCO-3 is less than 22 mEq/L.
- Clinical situations or conditions that cause metabolic acidemia include (a) increased metabolic formation of acids (diabetic ketoacidosis, uremic acidosis, lactic acidosis), (b) hyperkalemia, (c) toxins (salicylates overdose, ethylene and propylene glycol, methanol, paraldehyde), and (d) adrenal insufficiency.
- Management is directed at treating the underlying cause, decreasing acid formation (e.g., decreasing lactic acid production by improving cardiac output during shock), decreasing bicarbonate losses (e.g., treatment of diarrhea), removal of toxins via dialysis or cathartics, or administering sodium bicarbonate (NaHCO3) in extreme metabolic acidemia states.
- Respiratory Alkalemia: there is an excessive amount of ventilation (alveolar hyperventilation) and removal of CO2. If these changes persist for 24 hours or more, the kidneys begin to compensate by increasing bicarbonate excretion until normal or near-normal pH levels return.
- pH is above 7.45 and PaCO2 is less than 35 mm Hg.
- Clinical situations or conditions that cause respiratory alkalemia include (a) neurogenic hyperventilation, (b) interstitial lung diseases, (c) pulmonary embolism, (d) asthma, (e) acute anxiety/stress/fear, (f) hyperventilation syndromes, (g) excessive mechanical ventilation, and (h) severe hypoxemia.
- Management is directed at treating the underlying cause and decreasing excessive ventilation if possible.
- Respiratory Acidemia: there is an inadequate amount of ventilation (alveolar hypoventilation) and removal of CO2. If these changes persist for 24 hours or more, the kidneys begin to compensate by decreasing bicarbonate excretion until normal or near-normal pH levels return.
- pH is below 7.35 and PaCO2 is more than 45 mm Hg.
- Clinical situations or conditions that cause respiratory acidemia include (a) overall hypoventilation associated with respiratory failure (e.g., acute respiratory distress syndrome, severe asthma, pneumonia, chronic obstructive pulmonary diseases, sleep apnea), (b) pulmonary embolism, (c) pulmonary edema, (d) pneumothorax, (e) respiratory center depression, (f) neuromuscular disturbances in the presence of normal lungs, and (g) inadequate mechanical ventilation.
- Management is directed at treating the underlying cause and improving ventilation.
- Mixed (Combined) Disturbance is a simultaneous development of a primary respiratory and metabolic acid-base disturbance; for example, metabolic acidosis may develop from diabetic ketoacidosis, with respiratory acidosis occurring from respiratory failure associated with aspiration pneumonia. These disturbances create a more complex picture when examining ABGs (and are beyond the scope of this text!)
Oxygenation
After acid-base status has been determined, adequate of oxygenation is assessed. Normal values for PaO2 depend on the age and altitude. Lower levels of PaO2 are acceptable as normal with increasing age and altitude levels. In general, PaO2 levels between 80 and 100 mm Hg are considered normal on room air. If PaO2 drops below this level results in hypoxemia.
SaO2 levels are also affected by the same factors. 95% or above is considered a normal oxygen saturation. Hemoglobin saturation with oxygen is primarily influenced by the amount of available oxygen in the plasma. In general, as long as PaO2 levels are above 60 mm Hg, 90% or more of the hemoglobin is bound or saturated with O2. Changes in this equivalence may arise from temperature, pH, PaCO2, and abnormal hemoglobin conditions.
A variety of conditions may result in hypoxemia:
- Low inspired oxygen: occurs when the fraction of inspired oxygen concentration (FiO2) is reduced, such as in high altitudes or when toxic gases are inhaled. Inadequate or inappropriately low FiO2 administration may contribute to hypoxic respiratory failure in patients with other cardiopulmonary diseases.
- Overall hypoventilation: decreased tidal volume (VT), respiratory rate, or both. This results in reduced alveolar oxygen tension and increased PaCO2 levels.
- Respiratory center depression from drug overdose, anesthesia, excessive analgesia, neuromuscular disturbances, and fatigue
- Ventilation-perfusion mismatch: when the balance between adequately ventilated and perfused alveoli is altered, hypoxemia develops. Perfusion of blood past underventilated alveoli decreases the the availability of oxygen for gas exchange, leading to poorly oxygenated blood in the pulmonary vasculature.
- Bronchospasm, atelectasis, secretion retention, pneumonia, pulmonary embolism, pulmonary edema
- Diffusion defect: thickening of the alveolar-capillary membrane reduces diffusion.
- Chronic disease states e.g. pulmonary fibrosis and sarcoidosis
- Usually responds to supplemental oxygenation
- Shunt: blood bypasses or shunts past the alveoli, and gas exchange and oxygenation does not occur.
- Anatomical defects e.g. pulmonary arteriovenous fistulas, congenital cardiac anomalies of the heart and great vessels such as tetralogy of Fallot
- Physiologic shunts result from conditions that produce closed, nonventilated alveoli such as is seen in ARDS.
- Low mixed venous oxygenation: normally, PmVO2 does not affect PaO2 significantly. However, reduced PVO2 can lower the PaO2 significantly when either ventilation-perfusion mismatch or intrapulmonary shunting is present.
- Low CO, anemia, hypoxemia, and increased oxygen consumption.
- Tissue oxygen delivery by increasing cardiac output or hemoglobin usually improves mixed venous oxygen saturation (SvO2).
Pulse Oximetry
Pulse oximetry is a common method for continuous, noninvasive monitoring of SaO2. It is easy to use, well-tolerated, and portable. It reduces the need for an invasive arterial puncture, avoiding potential infection risks and blood loss from frequent analysis.
A sensor is applied to skin over areas with strong arterial pulsatile blood flow, typically one of the peripheral fingers or toes, but also optionally the bridge of the nose, ear, and forehead (the forehead sensor is a reflectance sensor and provides a central monitoring site location). The SaO2 sensor is connected to a pulse oximeter monitor unit via a cable.
- Light-emitting diodes on one side of the sensor transmits light of two different wavelengths (infrared and red) through arterial blood flowing under the sensor. Depending on the level of oxygen saturation, different amounts of light are detected on the other side of the sensor (transmission) or via scattered light on the same side of the light emitters (reflectance).
- This photodetection aspect of the sensor transmits information to the microprocessor within the monitor, which then calculates and displays the oxygen saturation and pulse rate.
When blood perfusion is adequate and SaO2 levels are greater than 70%, depending on the type of sensor and site, there is generally a close correlation between the saturating reading from the pulse oximeter (SpO2) and SaO2 directly measured from ABGs. In situations where perfusion to the sensor is markedly diminished (e.g., peripheral vasoconstriction due to disease, drugs, or hypothermia), the ability of the pulse oximeter to detect a signal may be less than under normal perfusion conditions. The major disadvantage of pulse oximetry is altered accuracy depending on adequate arterial pulsatile signal. Some conditions that may decrease accuracy include:
- Hypotension
- Low cardiac output states
- Vasoconstriction or vasoactive drugs
- Hypothermia
- Movement of the sensor and/or poor skin adherence
- Direct exposure to bright ambient light and certain nail polish applications and treatments.
Some more tips to maximize safety and accuracy of pulse oximetry:
- Apply sensor to dry finger of nondominant hand according to manufacturer’s directions and observe for adequate cardiac-based arterial pulse wave generation or signal on pulse oximeter unit.
- Avoid tension on the sensor cable.
- Rotate application sites and change sensor according to manufacturer direction whenever adherence is poor.
- In children and elderly patients, assess application sites more often and carefully assess skin integrity when using adhesive sensors.
- Never use pulse oximeters on non-approved monitoring site locations.
- If pulse wave generation is inadequate, check for proper adherence. Apply a new site to another site, if necessary.
- Compare pulse oximeter displayed SaO2 values with arterial blood gases periodically, when changes in clinical condition may decrease accuracy or if the values do not fit the clinical situation.
Assessing Pulmonary Function
A variety of measurements in addition to ABG analysis can be used to further evaluate the critically ill patient’s respiratory system.
- Tidal volume (VT) and minute ventilation are measured with a spirometer, is a measure of the normal volume of air that cycles in and out of the lungs per breath and per minute respectively.
- Negative Inspiratory Pressure (NIP), measured with an NIP meter, is the negative pressure generated from inspiration as the lungs expand, pulling air into the lungs.
- Lung compliance and alveolar oxygen content can be calculated with standard formulas
- Alveolar gas equation (PAO2):
- Static Compliance:
Airway Management
Maintaining an open and patent airway is an important aspect of critical care management. Patency can be ensured through conservative techniques such as coughing, head and neck positioning, and alignment. If conservative techniques fail, the insertion of an oral or nasal airway or ET may be required.
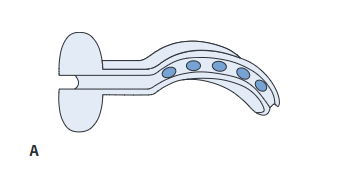
Oropharyngeal Airway
The oropharyngeal airway or oral bite block, is an airway adjunct used to relieve upper airway obstruction caused by tongue relaxation (e.g., postanesthesia or during unconsciousness), secretions, seizures, or biting down on oral ETs. These are temporary devices for achieving airway patency.
- Made of rigid plastic or rubber material, semicircular in shape, and available in sizes ranging from infants to adults.
- The airway is inserted with the concave curve of the airway facing up into the roof of the mouth, then rotated down 180° during insertion to fit the curvature of the tongue and ensure the tongues is not obstructing the airway.
- The tip of the oropharyngeal airway rests near the posterior pharyngeal wall. For this reason, oral airways are not recommended for use in alert patients as this may trigger the gag reflex and cause vomiting.
Management of oropharyngeal airways include:
- Frequent assessment of the lips and tongue to identify pressure points.
- Removal of the airway at least every 24 hours to check for pressure areas and provide oral hygiene.
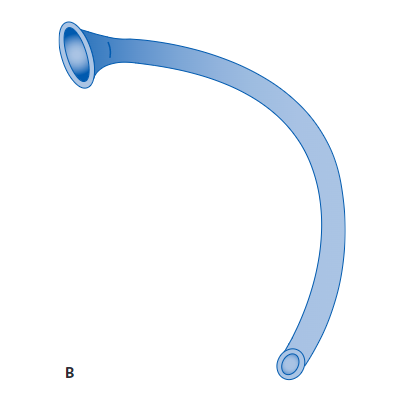
Nasopharyngeal Airway
The nasopharyngeal airway or nasal trumpet, is another type of airway adjunct device used to help maintain airway patency, especially in the semi-conscious patient. The nasopharyngeal airway is also used to facilitate nasotracheal suctioning.
- Made of soft malleable rubber or soft plastic, available in sizes ranging from 26 to 35 Fr.
- Prior to insertion, a topical anesthetic (e.g., viscous lidocaine), based on hospital policy, may be applied to the nares. The nasopharyngeal airway, lubricated with a water-soluble gel, is gently inserted into one of the nares.
- The patency of the airway is assessed by listening for, or feeling with your hand, air movement during expiration. The airway should be secured to the nose with a small piece of tape to prevent displacement.
Complications of these airways include bleeding, sinusitis, and erosion of the mucous membranes. Care of the patient with a nasal airway includes:
- Frequent assessment for pressure areas and occlusion of the airway with dried secretions.
- The continued need for the nasal airway is assessed daily.
- Rotation from nostril-to-nostril is done on a daily basis.
When performing nasotracheal suctioning through the nasal airway, the suction catheter is lubricated with a water-soluble gel to ease passage. Refer to the following discussion on suctioning for additional standards of care.
Laryngeal Mask Airway
The laryngeal mask airway (LMA) is an ET with a small mask on one end that can be passed orally over the larynx to provide ventilatory assistance and prevent aspiration. Placement of the LMA is easier than intubation using a standard ET.
- Commonly used as the primary airway device in the operating room for certain types of surgical procedures, it should, however, only be considered a temporary airway for patients who require prolonged ventilatory support.
Esophageal Tracheal Airway
Esophageal tracheal airways are double-lumen airways that allow for rapid airway establishment through either esophageal or tracheal placement. They are used primarily for difficult or emergency intubation and the design permits blind placement without the need for a laryngoscope. The multifunction design permits positive-pressure ventilation, but an ET tube or tracheostomy is eventually needed.
- The primary advantages to using the airways include less training required to use than standard intubation, no special required, and the cuff provides some protection against aspiration of gastric contents.
- The tube is contraindicated in responsive patients with intact gag reflexes, patients with esophageal pathology, and patients who have ingested caustic substances.
- The tube is sized to patient’s height.
Artificial Airways
Artificial airways (oral and nasal endotracheal tubes, tracheostomy tubes) are used when a patent airway cannot be maintained with an adjunct airway device for mechanical ventilation or to manage severe airway obstruction. The artificial airway also protects the lower airway from aspiration of oral or gastric secretions and allows for easier secretion removal.
Endotracheal Tubes
Endotracheal tubes are made of either polyvinyl chloride or silicone and are available in a variety of sizes and length. Standard features include a 15-mm adapter at the end of the tube for connection to various life-support equipment such as mechanical ventilation circuits, closed-suction catheter systems, swivel adaptors, or a manual resuscitation bag (MRB). These may be left in place for up to 2 to 3 weeks, but a tracheostomy is often considered following 10 to 14 days of intubation or less. If the need for an artificial airway is anticipated for an extended period of time, a tracheostomy tube may be indicated earlier, but the decision is always individualized.
- These are inserted into the patient’s trachea through the mouth or nose. Orally inserted ETs are more common, as nasal intubation is associated with sinus infections and are considered an independent risk factor for developing ventilator-associated pneumonia (VAP).
- With use of the laryngoscope, the upper airway is visualized and the tube is inserted through the vocal cords into the trachea, 2 to 4 cm above the carina.
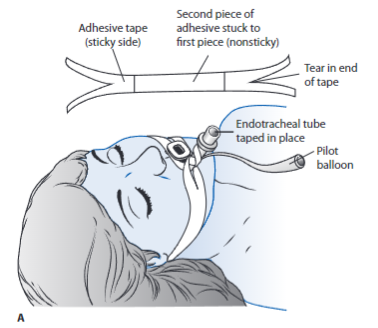
- Proper Tube Placement: the presence of bilateral breath sounds, along with equal chest excursion during inspiration and the absence of breath sounds over the stomach, preliminarily confirms proper tube placement. An end-tidal CO2 with waveform verification monitor should be used as immediate assessment for determining tracheal placement. If not available a colorimetric CO2 detector may be used. A portable chest x-ray verifies proper tube placement. Once confirmed, the tube is anchored to prevent movement with either tape or a special ET fixation device. The centimeter marking of the ET tube at the lip is documented and checked during each shift to monitor proper tube placement.
- ET Sizes: typically identified by the tube’s internal diameter in millimeters (mm ID). The size of the tube is printed on the tube and generally also on the outside packaging. Knowledge of the tube ID is critical; the smaller the mm ID, the higher the resistance to breathing through the tube, thus increasing the work of breathing. The most common ET sizes used in adults are 7.0 to 9.0 mm ID.
- Complications of ET intubation are numerous and include laryngeal and tracheal damage, laryngospasm, aspiration, infection, discomfort, sinusitis, and subgottic injury.
Tracheostomy Tubes
Tracheostomy tubes are mainly used in critically ill patients and are made of medical-grade plastic or silicone that comes in a variety of sizes. They may be cuffed or uncuffed. As with ET tubes, a standard 15-mm adapter at the proximal end ensures universal connection to MRBs and ventilator circuits. These are better tolerated by patients than oral or nasal ET tubes in terms of comfort. Tracheostomy tubes may be inserted as an elective procedure using a standard open surgical technique in the operating room or at the bedside via a percutaneous insertion. This technique involves a procedure in which a small incision is made in the neck and a series of dilators are manually passed into the trachea over a guide wire, creating a stoma opening through which the tracheostomy tube is inserted into place. Bedside placement obviates the need for patient transport outside the ICU with its associated risks and the need for general anesthesia.
- Tracheostomies are secured with cotton twill tape or latex-free Velcro latching tube holders attached to the openings on the neck flange or plate of the tube. Many tracheostomy tubes have inner cannulae that can easily be removed for periodic cleaning (reusable) or replacement (disposable).
- Some tracheostomy tubes incorporate an additional opening along the outer tube cannula referred to as a fenestration. A fenestrated tracheostomy tube is sometimes used as an aid for facilitating vocalization by allowing airflow upward and through the vocal cords. A fenestration is not necessary to be able to talk with a tracheostomy tube.
- There are more nutrition and communication options available to patients with tracheostomy tubes than with endotracheal tubes.
- Complications include hemorrhage from erosion of the innominate artery, tracheal stenosis, infection, air leak, and mechanical problems. Most of these rarely occur with proper management.
Cuff Inflation
Following the insertion of an endotracheal or tracheostomy tube, the cuff of the tube is inflated with just enough air to create an effective seal. The cuff is typically inflated with the lowest possible pressure that prevents air leak during mechanical ventilation and decreases the risk of pulmonary aspiration.
- Cuff pressure is maintained at less than 20 mm Hg (30 cm H2O). Excessive cuff pressure causes tracheal ischemia, necrosis, and erosion, as well as overinflation-related obstruction of the distal airway from cuff herniation.
- Even properly inflated cuffed artificial airways do not completely protect the patient from aspiration of liquids.
There are two common techniques to ensure proper cuff inflation:
- Minimal leak technique involves listening over the larynx during positive pressure breaths with a stethoscope while inflating the tube cuff in 1- to 2-mL increments. Inflation continues until only a small air leak, or rush of air, is heard over the larynx during peak inspiration.
- This technique should result in no more than a 50- to 100-mL air loss per breath during mechanical ventilation.
- The cuff pressure and amount of air instilled into the cuff are recorded following the maneuver.
- Minimal occlusive volume cuff inflation technique is similar to the minimal leak technique, but continues until the air leak completely disappears.
- The cuff pressure and amount of air instilled into the cuff are recorded following the maneuver and periodically to ensure an intracuff pressure of less than 25 mm Hg (30 cm H2O). Manual palpation of the tube pilot balloon does not ensure optimal inflation assessment.
Endotracheal Suctioning
Pulmonary secretion removal is normally accomplished by coughing. An effective cough requires a closed epiglottis so that intrathoracic pressure can be increased prior to sudden opening of the epiglottis and secretion expulsion. The presence of an artificial airway such as an ET tube prevents glottic closure and effective coughing, necessitating the use of periodic endotracheal suctioning to remove secretions. Currently, there are two methods for ET tube suctioning:
- Closed suctioning means the ventilator circuit remains closed while suctioning is performed. This refers to a closed suction catheter system that remains attached to the ventilator circuit, allowing for period insertion of the suction catheter through a diaphragm to suction without removing the patient from the ventilator. After the procedure, a plastic sleeve of the in-line device stores the suction catheter.
- Open suctioning means the ventilator circuit is opened, or removed, during suctioning. This method requires disconnected of the ET tube from the mechanical ventilator or oxygen therapy source and insertion of a suction catheter each time the patient requires suctioning.
Indication for ET suctioning is determined by a variety of clinical signs and symptoms, such as coughing, increased inspiratory pressures on the ventilator, and the presence of adventitious sounds (rhonchi, gurgling) during chest auscultation. Suctioning may also be performed periodically to ensure airway patency. Suctioning is only done when there is a clinical indication and never on a routine schedule.
Procedure
Data from Chulay M, Seckel MA. Suctioning: endotracheal or tracheostomy tube. In Wiegand DL, ed. AACN Procedure Manual for Critical Care. 6th ed. Philadelphia, PA: Saunders; 2011.
- Assess for signs and symptoms of airway obstruction: secretions in the airway; decreased breath sounds, inspiratory wheezes, or expiratory crackles; restlessness or decreased level of consciousness; ineffective coughing; tachypnea, shallow respirations, or decreased respirations; tachycardia, or bradycardia; cyanosis; hypertension or hypotension.
- The patient is hyperoxygenated with 100% O2 for a minimum of 30 seconds prior to each suctioning episode, whether using an open or closed technique. This helps prevent decreases in arterial oxygen levels after suctioning. This can be achieved by increasing the FiO2 setting on the mechanical ventilator or by using the “suction” button or temporary oxygen-enrichment program available on most microprocessor ventilators.
- The use of an MRB is not recommended as the best choice as it has been shown to be ineffective for providing a delivered FiO2 of 1.0. It is used only when no other equipment is available.
- In spontaneously breathing patients, encourage several deep breaths of 100% O2 before and after each suction pass.
- Insert catheter gently until resistance is met, then withdraw by 1 cm.
- Apply suction by placing the non-dominant thumb over the control vent of the suction catheter to apply continuous or intermittent suction as the catheter is completely withdrawn.
- Suction should be applied only as needed and for as short a time as possible. The number of suction passes is limited to only those necessary to clear the airway of secretions— usually two or three. Each pass of the suction catheter should be 15 seconds or less. This act can stimulate the vagus nerve and result in bradycardia or asystole.
- The method of instilling 5 to 10 mL of normal saline has shown no benefit during ET tube suctioning. It is also associated with SaO2 decreases and bronchospasm.
- Repeat steps 2 to 4 as needed if secretions remain and the patient is tolerating the procedure.
- Monitor cardiopulmonary status before, during, and after suctioning:
- Decreased arterial or mixed venous oxygen saturation
- Decreased oxygenation
- Cardiac dysrhythmias
- Bronchospasms
- Respiratory distress
- Cyanosis
- Hypertension
- Increased ICP
- Anxiety, agitation, pain or change in level of consciousness
- Increased peak airway pressure
- Coughing
- Increased work of breathing
Complications
As mentioned, there are a variety of complications associated with ET tube suctioning. Many of these complications can be minimized by using sterile technique, vigilant monitoring during and after suctioning, and adequate hyperoxygenation before and after each suction pass.
- Decreases in PaO2 have been well documented when no hyperoxygenation therapy is provided with suctioning.
- Serious cardiac arrhythmias (bradycardia, asystole, ventricular tachycardia, and heart block) occur occasionally with suctioning.
- Less serious cardiac arrhythmias (premature ventricular contractions, atrial contractions, and supraventricular tachycardia) frequently occur with suctioning.
- Other complications include increases in arterial pressure and intracranial pressure, bronchospasm, tracheal wall damage, and nosocomial pneumonia.
Extubation
The reversal or significant improvement of the underlying condition(s) that led to the use of artificial airways usually signals the readiness for removal of the airway. Common indicators of readiness for artificial airway removal include the ability to:
- Maintain spontaneous breathing and adequate ABG values with minimal to moderate amounts of O2 administration (FiO2 < 0.50).
- Protect the airway.
- Clear pulmonary secretions (cough).
Removal usually occurs following weaning from mechanical ventilatory support (discussed later). Preparations for extubation include an explanation to the patient and family of what to expect, the need to cough, medication for pain, setting up appropriate method for delivering O2 therapy (e.g., face mask, nasal cannula), and positioning the patient with the head of the bed elevated at 30° to 45° to improve diaphragmatic function.
- Suctioning of the artificial airway is performed prior to extubation if clinically indicated.
- Obtaining a baseline cardiopulmonary assessment is also important for later evaluation of the response to extubation.
- Extubation is only performed if full ancillary staff is available to assist if reintubation is required.
- Hyperoxygenation is performed for 30 to 60 seconds prior to extubation in case respiratory distress occurs immediately after extubation and reintubation is necessary.
- The artificial airway is then removed following complete deflation of the ET or tracheostomy cuff, if present.
- Immediately apply the oxygen delivery method and encourage the patient to take deep breaths.